

 WishLists
 My Account


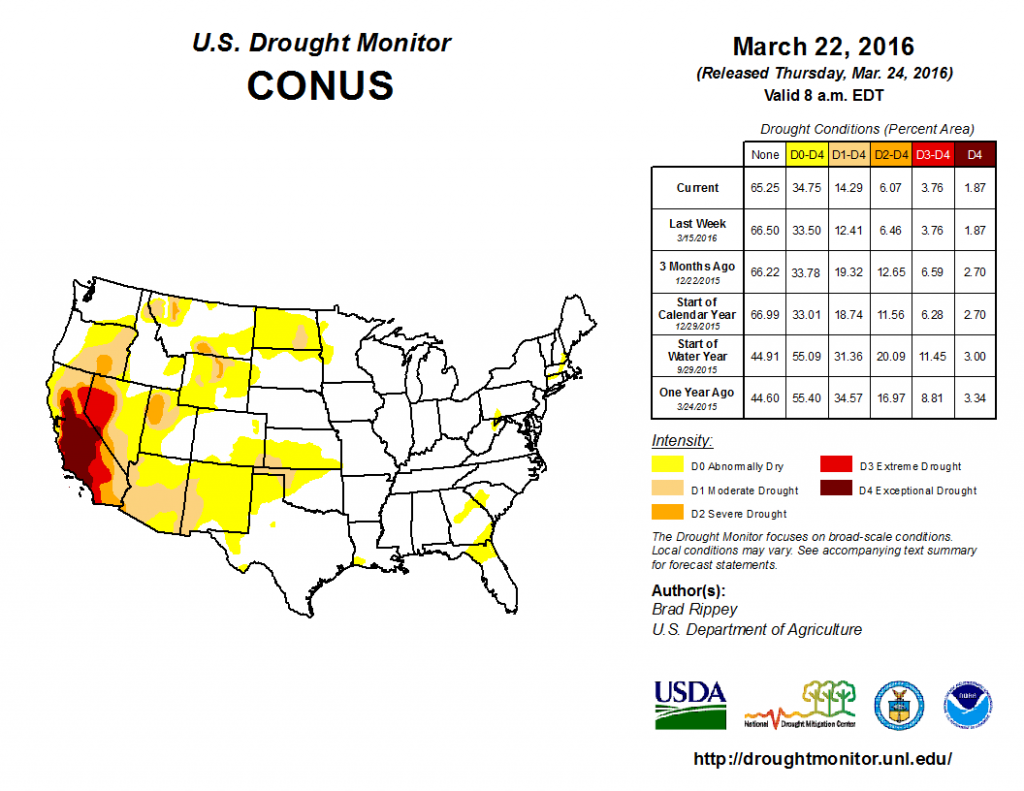
According to the United States Drought Monitor, more than 33% of Americans experience moderate to severe drought conditions at some point throughout the year. Areas hit the hardest, such as California and Nevada, don’t often get a break from these harsh weather conditions. In many cases, drought conditions lead to restrictions being placed on homeowner water usage. If you are among those affected by drought, you know that the dry conditions can wreak havoc on your grass, flowerbeds and landscape. Say goodbye to the constant struggle to keep your lawn alive and get the incredible curb appeal you have always waned by creating a drought-proof landscape.
Removing Grass from Your Yard
Over the next month we are going to be sharing our four tips for creating a drought-proof landscape you are absolutely going to love, focusing one one of the four strategies each week. Perhaps the biggest challenge for landscaping a home in an area of drought is keeping the grass weed-free and healthy. The best course of action you can take is to remove the grass completely. Don’t worry; there are many methods you can use to safely remove your grass without dousing your yard in harsh herbicides. Today, we will walk you through two of our favorite ways to safely remove your grass and prepare your yard for hardscaping.
Method 1: Dig Out the Grass
Although digging out your grass is great in that it provides immediate results, be prepared to work hard. This is by far the most labor-intensive way to remove grass from your yard. If you have a small yard and hope to transform your yard in a single weekend, this is the best method for you. Gather up as many friends as possible because you will want the extra help to get the job done.
Before you get started, make sure to check with the utility company for any underground lines. If you have an underground irrigation system, it is also important that you mark any sprinkler heads so you don’t accidentally break them with your shovel.
What You’ll Need
- Shovels & Spades
- Rakes
- Gloves (to protect your hands)
- Tiller (optional) or Sod Cutter (optional)
Prep the Sod
Before you can begin removing the grass, you must first prepare it by either tilling the grass or cutting the sod into strips. You can rent both tillers and sod cutters from your local hardware store. If you don’t have either available, you can also cut your sod into strips using a sharp spade and cutting the sod into strips by hand. Which method you choose is entirely up to you.
Dig Up the Grass
Now that your yard is prepped, it is time to get to the hard part. One scoop at a time, shovel the grass out of your yard, loading up a lawn debris bag. As you do this, try to remove as little of the dirt as possible. If you have used a sod cutter to prep your grass, you may be able to simply roll up the grass, one strip at a time. Continue until all the grass has been removed from your yard. Go back by hand with a rake and get up any remaining roots that may be left behind. When you remove the grass, remove about one inch of soil to ensure the grass does not grow back with any residual roots.
Method 2: The Layering Method to Remove Grass
The second method, and our personal favorite, is the layering method. This method of grass removal is a safe and eco-friendly way to kill the grass in your yard for easy removal. The only downside is that this method does take some time to complete. this method can be done with your choice of newspaper or black plastic. If you receive the paper to your house, chances are you have a ton of it stacked up somewhere. If not, cardboard is an affordable alternative.
What You’ll Need:
- Mower
- Newspaper or Cardboard
- Organic Mulch
Preparing the Yard
Before you do anything else, mow the entire yard with the blade set at the lowest setting. You want to get the grass as low as possible to give you a head start with this grass removal method. When you are done, wet the grass.
Lay Down Newspaper or Cardboard
With your yard moved nice and low, it is now time to cover it up. Go around the yard, covering up all the exposed grass with either newspaper or plastic. If you are using newspaper, cover each area with 8-10 sheets, using an overlapping method to ensure the paper does not blow away or let any sunlight in.
Add Mulch & Wait
Once you have an area covered with newspaper, wet the paper again to weigh it down and keep it from blowing away as you continue with the process. When you are done, cover the area with organic mulch and water one more time.
This same method can be completed with cardboard instead of newspaper. Open moving boxes are a great resource for cardboard. In a month or two the grass will be dead and you will be left with a blank slate for your new drought-proof landscape.
The Next Steps in Creating A Drought-Proof Landscape
Over the next few weeks we will be going over the final three steps in creating a drought-proof landscape: adding hardscaping, choosing low-water plants, and incorporating artificial outdoor plants and trees in your finished landscape. You won’t want to miss the rest of this series so look out for our next blog.
Have fun Creating Your Drought-Proof Landscape
We can’t wait to see how you use our four tips to completely transform your dry landscape into a gorgeous yard the whole neighborhood will envy. If you missed any of the four installments of this blog series, do not fear, we have included a full list below along with an infographic explaining the entire process. Feel free to share your before and after photos with us on our Facebook page. We would love to see what you did.
- Creating a Drought-Proof Landscape Part 1: Removing Your Grass:
- Creating a Drought-Proof Landscape Part 2: Make Hardscaping the Star
- Creating a Drought-Proof Landscape Part 3: Choose Low-Water Plants
- Creating a Drought-Proof Landscape Part 4: Incorporate Artificial Plants and Trees
About Philip Travers
Twitter •
